Get Started
Target Database Support
Data Migrator supports the following target database, which may require prerequisite setup for data loading:
- PostgreSQL: For PostgreSQL, Data Migrator employs
copycommand to execute bulk data loading operations. This process is pre-configured and requires no additional configuration. Microsoft SQL Server: For Microsoft SQL Server (MSSQL), Data Migrator provides three distinct bulk loading data mechanisms
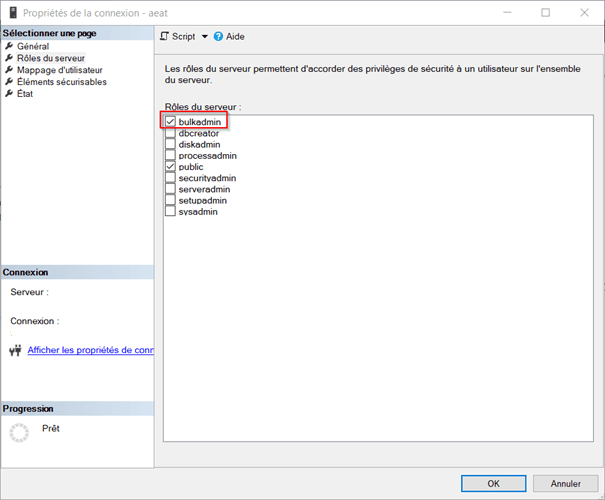
- BULK INSERT [default mode]: Data Migrator uses
BULK INSERTstatement for MSSQL. This mode requires thebulkadminserver role, configurable via Microsoft SQL Server Management Studio.
- INSERT INTO: This loading mode is optimized for Proof of Concept (POC), facilitating rapid prototyping. However, it has performance and stability issues for large projects. It requires no additional configuration.
- BCP UTILITY: Data Migrator integrates the Bulk Copy Program (bcp) utility to extend its data ingestion capabilities to support more types of databases, such as Amazon RDS for SQL Server. To use this mode, bcp utility installation is required.
- BULK INSERT [default mode]: Data Migrator uses
- Oracle: To bulk-load data, Data Migrator uses Oracle SQL*Loader (sqlldr) utility. This process requires no additional configuration. Nevertheless, sqlldr must be properly installed and accessible in the system path on the machine running Data Migrator.
- DB2LUW: For DB2 on Linux, UNIX, and Windows (LUW), Data Migrator leverages the
LOADcommand to perform bulk data loading operations. This process requires the host machine to have the DB2 command-line environment properly set up. No additional configuration is required.
Configuration file
Configuration for Data Migrator is managed through two distinct .ini files, enhancing readability and organization:
- config.ini: Contains one or more configuration steps.
- all.ini: Contains one or more action steps, including the optional global step.
Each .ini file can define multiple steps, allowing for a structured and modular approach to Data Migrator tasks.
A step corresponds to a section in the .ini file.
Each section has an id as title. The id is a combination of a type and a name connected with a hyphen. (e.g.[type - name])
The section type must be one of the following:
- Database: for a configuration step.
- ExecuteSql: for a creation or deletion step.
- CSV2DB: for a CSV data loading step.
- EBCDIC2DB: for an EBCDIC data loading step.
- ConvertQDDS: for a QDDS data conversion step.
Notes
- A section should have a unique id. If many sections have the same id, only the content of the last one will be taken into consideration, however, the order of the first one will be kept.
- Steps must specify non-empty values for their properties.
- If a property is missing from a step, Data Migrator applies the default value instead and environment variables can set property values.
How it works
Data Migrator establishes connections to databases based on the parameters defined in the database configuration step.
The tool performs all enabled action steps specified:
- Creation or deletion: Execute SQL scripts from the step's input directory.
- Conversion: Transforms data from the input directory and saves results to the output directory of the step.
- Loading:
- The tool loads data included in the input directory of the step to the database
- It determines which tables to fill by taken from
sqlModel.jsontable list if exists. Otherwise collected from SQL files.
Under the designed data folder (dataFolder), data files must be stored under the folder named as the table name.

Return code
The Data Migrator migration process ends with one of the following status codes:
| Code | Description |
| 0 | Success |
| 1 | Failure |
| 2 | Configuration invalid |
| 3 | Database creation error |
| 4 | QDDS conversion error |
| 5 | Data migration error |
| 6 | Database post process error |
Prerequisites
- Java 17 needs to be installed.
- You need to have access to the Data Migrator S3 bucket. If you don’t have access yet, you can request it via Blu Insights Toolbox.
- You need to have minimal IAM policies on your account to download the Data Migrator from S3 bucket. In case you don't have policies, then create one with the below information.
{
  "Version": "2012-10-17",
  "Statement": [
      {
          "Effect": "Allow",
          "Action": [
              "s3:ListBucket"
          ],
          "Resource": [
              "arn:aws:s3:::toolbox-data-migrator"
          ]
      },
      {
          "Effect": "Allow",
          "Action": [
              "s3:GetObject"
          ],
          "Resource": [
              "arn:aws:s3:::toolbox-data-migrator/*"
          ]
      }
  ]
}- Each empty database must be first manually created.
Run with binaries
Installation guide
Toolbox buckets are replicated on the us-east-1 and us-east-2 regions. To use these replicated buckets, append the region to the bucket name: e.g. s3://toolbox-data-migrator-us-east-1. Make sure to adapt your user or role policy accordingly.
- Check that you configure the AWS credentials with the AWS account used in your request made in Blu Insights Toolbox.
- Download Data Migrator last version archive using the command
aws s3 cp --recursive s3://toolbox-data-migrator/latest LOCAL_PATH - Unpack the archive present in
LOCAL_PATH.
How to launch it
To launch the steps migration in command line, open your favorite shell and type:
- For Linux/MacOS, the command will be as following:
BluageVelocityDataMigrator.sh -root [migrationProjectPath] -configurationIni [configurationFilePath];[stepsConfigurationFilePath]- For Windows, two extensions are available. Therefore, the command will be as following:
BluageVelocityDataMigrator.[bat/ps1] -root [migrationProjectPath] -configurationIni [configurationFilePath];[stepsConfigurationFilePath]Parameters
- migrationProjectPath : Absolute path to your migration project.
- configurationFilePath : Absolute or relative path to your migration configuration file.
- stepsConfigurationFilePath : Absolute or relative path to your migration steps configuration file.
The relative paths in the command will be resolved to the specified reverse project.
Options
The following options can be used when launching the migration using the command line:
- help : Display the help; it includes the options below.
- root : Root directory for the relative paths in the command line. Usually the path of your migration/reverse project.
- configurationIni : Load the configuration from ini files, separated by semicolon.